This article, published 50 years ago in Air Facts, shows how the fundamentals of instrument flying remain constant. While the technology has changed dramatically since Bob Buck wrote these words, the practical lessons are as valid today as they were in 1969.
Approaches come in various types: Omni, ADF, PAR, ILS and a few left over Radio Ranges. The object of each one is to get us in a position from which we can see the airport or runway and land visually because, like in the Wright Brothers’ times, airplanes finally touch back on earth by a pilot eyeballing the ground and putting her on by judgment and feel. This doesn’t count blind landings being done in research and proving flights which are aimed toward automatic landings in zero-zero conditions for keeps with people on board. But let’s not hold our breath until that comes about, however, because we would get awfully blue in the face if we did.
During an approach we work, as we let down, with a high degree of precision to make the airplane go left, right, up and down. We must manage, with equal care, sink rate and air speed.
Most approaches are really made in weather that’s pretty good. The percentage of approaches being right down to 200 feet before the ground shows up is pretty small. As a full time airline pilot I’ll bet I don’t make a dozen a year. Most approaches are made to some ceiling that’s broken or overcast with scattered scud and some sort of precipitation. The ground becomes visible within a couple of hundred feet of 800 feet. If it weren’t for ATC, control zones, etc., we could fly contact, although not VFR, probably.
But make no mistake, making approaches via some electronic aid is better, by far, than barnstorming around trying to see the ground while figuring out where one is.
The navigation aids available today have made finding the place to land an easy, relaxed job and using them is the way to do business.
Instinctively
Unfortunately our human instincts make it so that we want to see the ground, the good earth, as soon as we can. This urge to get down there and see it is the first way people get in trouble.
Because most approaches begin to pick up the ground from a relatively high altitude, there’s a great temptation to feel the approach is over and we can finish the flight by looking outside. This is just the time a wisp of scud floats by and we go through it, or a shower cuts visibility and suddenly we aren’t sure where we are or where the airport is either.
A serious part of this leaving instruments and going contact prematurely is that we are very apt to descend without realizing we are doing so. We see the ground and want to get down to it so we descend, unconsciously. After a few minutes of looking out, flying contact, we may look back at the altimeter and be shocked to find we’re much lower than we ought to be. With poor visibility, a chance we may go back on instruments, not knowing exactly where we are, or where obstructions are, we can be in bad trouble.
So it’s wise to remember that the approach isn’t over until we can see the airport and runway. Really there isn’t any point in looking out until we are at minimums. Doing this we fly with our best precision and are on course as we should be and at the correct, safe altitudes along the way — and it’s good practice. But if we get eager about seeing the ground our attention isn’t 100% on the instrument flying job as we sneak looks outside, and the approach is sloppy and the chances for missing it quite high.
The instrument approach is designed to get us safely to the minimum altitude and in the best position to see the runway. Why try to improve on that by “going contact?”
Troubles after Breakout
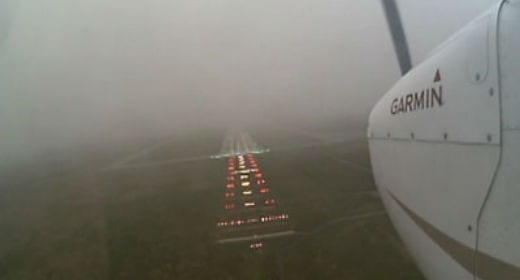
There are still problems after we get contact, even in relatively good weather such as a mile or more visibility. If the approach is over a dark area, such as an airport surrounded by water or empty land at night, or in the daytime when the visibility is reduced and made smazy by fog or snow or such, and if the runway doesn’t have a Visual Approach Slope Indicator (VASI), a pilot must be very careful not to fly into the ground or water. There are enough dunked airplanes to prove the point.
Once the runway comes in view a pilot tends to do all his looking outside the cockpit at the runway, lining up on it, setting up his glideslope visually. If there isn’t visual glideslope reference, such as VASI, his vision can play tricks and he may well be a lot lower than he thinks.
A few lights may make it worse and studies made years ago by Prosper Cocqyt, a Belgian airline pilot, and since confirmed by others, prove that a few lights off to one side may, as the pilot banks even slightly, given an erroneous idea of altitude in impressive amounts, enough so that people have flown into the ground or water while visual and thinking they were well above the surface.
Looking ahead at the runway lights or approach lights does not help glide path selection. Different kinds of visibility — clear, hazy, smoky, snowy, etc. — make the lights come through in different intensities and give different ideas of how high we are. You cannot judge altitude by eyeballing the approach and runway lights, and don’t ever think you can! It’s an awful shock to think you are 300 feet and discover you’re only 100 feet over the lights!
If the runway has VASI we simply stay on the visual glideslope it presents and we’ll miss everything, but lots of runways don’t have it. What then?
Two things in the cockpit help. One is the electronic glideslope on the dial, the other is the altimeter, plus, in its way, the vertical speed indicator.
But before we start into these aids let’s make certain we are clear on one item and that is scanning. Any instrument flying requires scanning and if we wrote an article on instrument flying with nothing on the pages except the word SCANNING, it would be a good article! Our eyes cannot park on one instrument for any length of time if we are doing a good, safe instrument flying job.
While on instruments we scan the instrument panel, covering the needed items, then, after we break out of the clouds, our scanning has to cover both inside and outside the airplane to some degree.
In its simplest sense we look out at the runway, but we also glance at the airspeed indicator enough to keep our speed where it should be. Well, we’d better look at the altimeter too, and more frequently than perhaps we have considered necessary before.
Our scan, when contact, should include the glideslope on our instrument panel to see that we’re not below it. That’s another way of preventing flying into the ground or water.
Glideslope Limit
But a note of caution. Glideslopes do not give accurate information all the way to the ground. They deteriorate and give false and erratic signals somewhere around 100 feet. Some do well down to 80 feet and some start coming apart as high as 150 feet. Which means we can’t trust them much below 150 feet. But if we have stayed on or above the glideslope that far and keep our descent rate close to the one we’ve been using, the airplane will probably be over the runway or close to it when the glideslope deteriorates so that it would be unlikely we’d get dangerously low outside the airport boundary.
A glance at the vertical speed indicator, as we fly contact, will show any large descent rates developing which, in turn, may show a quick large altitude loss starting to occur. Since the ILS takes a near constant descent rate to stay on the glideslope, let’s say 500 feet per minute for example, then any large increase above that will mean we are headed down and since we may be only 600 feet or so high it does not take long to get down dangerously low.
If there isn’t any electronic glideslope then our clue to staying high is the altimeter and vertical speed indicator.
So after break-out we should remember that much scanning of the altimeter and vertical speed indicator is needed to assure that we’re clearing the ground by a good margin.
I’ve got a variometer in my sailplane — that’s a sensitive vertical speed indicator with some extra sophistication — that has an audio attachment. As I get lift and go up it makes an exciting sound that increases in pitch, really a clacking sound, the faster the glider goes up. When I get in sink and come down, the variometer gives out a groaning whine that changes pitch distinctly the faster I come down. So I can work lift and sink and watch outside for traffic, navigation and so on. I’ve often thought it might be a good idea to have this audio down part of a variometer in airplanes. It could be set to sound off at some value beginning, say, at 1000 fpm, and squawk louder the faster the airplane descended. It would be a great warning to the pilot that he was headed for “too low” territory. I rigged one up in my Cessna Skyland and flew it for a while and it worked well.
But we don’t have things like that so the rule is scan, scan, scan! Watch altitude closely until the pavement of the runway has actually passed under the wheels.
Low Approach Technique
Let’s back up the approach a bit, now, to the outer marker or about that distance from the field. A lot happens there that dictates if an approach is going to be good or not.
First, are we ready? Is the airplane set so we don’t have to do much to it from there to the ground? It should be. Flaps set, fuel valves set, speed reduced and all the things that particular airplane calls for.
The next thing is to get on the ILS, Omni, ADF or whatever, as soon as possible. Get it tied down quickly so you know what heading it is taking to stay on course. When the glideslope comes in get the rates of descent established as soon as possible. These will change, of course, with wind changes during descent, but if they have been established early then it makes catching wind shifts and shear easier.
As we come down the approach the key, again, is scanning and doing things promptly. I don’t mean jerky or panicky, but I mean recognizing drifting off the ILS and doing something about it right then — or on any other approach. The quicker we recognize an excursion from normal and the quicker we act on it the smaller our corrections will be and therefore easier to make. Simply, by prompt response, the entire operation never gets very far off and if it never gets far off it’s an easy approach to manage.
We should fly instruments, of course, by the attitude method. We fly the airplane normally by the attitude method and we should fly the approach by it too.
Believe It or Not
On an approach our attitude references, regarding the approach, are the heading and the vertical speed. We don’t chase needles. We fly a heading and see what the localizer is doing in regard to that heading. We fly the rate of descent and see what the glideslope is doing in relation to that descent rate. The heading and rate of descent are the things we fly, the instruments we work with to get the attitude that will produce the path we want, just as we use the horizon to give us an airplane attitude that will result in the condition we want of left and right, and nose up or down.
The rate of descent and the heading are flown by attitude, too. A certain amount of down on the horizon will give a certain descent rate, a bank on the horizon will give us turn. And all this relates back to scanning again. We come down the glide path and tend to get low. The rate of descent is too much. We have been using 600 fpm and we are going to reduce that to 500 fpm. So we raise the nose on the artificial horizon to change attitude and effect a rate of descent change. It isn’t much and will not change the airspeed enough to require a power change, probably, but we flick an eye on the airspeed indicator anyway to see that it stays within bounds. At the same time our heading needs a nudge of 5 degrees. We do this by banking, watching the attitude of the artificial horizon to do it. Our eyes, as we have an instant while the heading is coming around and the rate of descent slacks toward 500 fpm, look at altitude airspeed, the ADF needle and the power setting. Then, before an instant has passed, back to the horizon for attitude of the airplane because we know that if the artificial horizon is within limits, i.e., no bank and the bar just where we want it for nose position, the airplane cannot be off or getting off. And all this scanning is done fast and often.
The “When To” Indicator
We not only refer to altitude as a safety item in the sense of, “Are we clearing all terrain?” but we also think of it in the sense of minimums, and say to ourselves, as it gets down toward the lowest we can go, “I’m getting down to the bottom. What do I do if I don’t see the ground?” Of course we’ve studied the missed approach procedure in advance and have that in mind. But what I mean is that as we approach the minimums we have to sort of prepare ourselves mentally to be ready to shift gears and go from concentrating on a descent to a sudden application of power and climbing. Near minimums we have an almost split attention. One focus has us prepared for seeing the runway, reducing power and landing, while the other prepares us to pour on the coal, lift the nose and shoot for a certain heading and altitude. This is all possible but it requires attention.
Another point about altitude is the published glideslope altitude at the outer marker. It’s important to check, as you pass the marker, that the airplane’s altimeter reads what the published figures say it should. If it’s out much then it’s time to be suspicious of something being wrong with your equipment or the ILS and perhaps it’s best to get up and out and find out what it is. An inaccurate altimeter setting can be discovered this way and I actually caught a wrong one that had been given me by checking the outer marker altitude.
Listen Too
An additional check during an approach is to listen to the facility. I keep the ILS on audio, but turned down low, during an approach. The little red flags don’t always tell all failures. ILS indicators center when something fails and if we have failed to notice the flag — and that’s easier to do than one might imagine — with the indicator centered a pilot may keep flying along happily thinking everything is fine when actually he’s in trouble. The interruption of the audio signal, while not a cure all, may be just the added warning that makes itself register on one’s mind. Also if the communication radio fails the ground may use the ILS or Omni frequency to tell us something.
The Right Speed
Speed control during an approach is important. Mostly it shouldn’t be too high. It’s so easy to let the speed build up and then when the runway is finally seen and crossed the airplane floats over a good portion of it before touching down. In weather conditions this is often bad because the runway surface is slick with rain or even ice and it’s difficult to stop. Know a good safe speed and then stick to it.
There’s a special temptation to let speed build up if we have early contact and are circling the field or otherwise barnstorming around trying to get lined up for landing. The 10 knots for Ma, and 10 knots for me and 10 knots for the kids sounds amusing, but it isn’t very mature. A good pilot can use workable speeds and there’s as much trouble caused by having too much speed for the entire family as there is in not having enough.
That Impulse Again
Coming down an ILS we’ve established a good rate of descent, one that’s bringing us down the glideslope well, so when we break out let’s keep something like that rate of descent on down to the ground and land where the glideslope aims us. The temptation to shove the nose down when the ground comes in view is an easy way to hang the wheels back on the approach lights. This action all started, I feel quite certain, during radio range days when an approach was to come over the range station at 1000 feet, cross the cone of silence and then “shove her over” until the ground came in view, or didn’t and you pulled out. It was a wilder time in flying’s history, the approach wasn’t very precision like and the airplanes were a lot slower landing than transport airplanes today and even slower than some of our present General Aviation airplanes — and to prove it wasn’t a good idea the accident rate then wasn’t nearly as good as the one today. So resist the temptation to shove her over when the ground comes in view. Just keep that descent rate and come on down in gentle fashion.
Pride Goeth Before
A little point about landing during bad weather is that it isn’t any time to worry about making a slick landing. We all know it’s fun to show off and land smoothly and it can be done by carrying a little extra speed and floating her on. But this is kind of like cheating at solitaire. So who are we kidding? All we’re doing is floating over a lot of good stopping pavement. When the weather is bad and the runway slick the object is to get her on and stopped before the other end of the runway shows up! If it wants to float or not land, put her on even if it’s a little firm. But get the wheels where the stopping is most effective — on the ground!
Once on the ground don’t be fooled by these so called high speed turn-offs. If you’ve never used one try it the first time at pretty slow speed. If the runway is wet and slick and you come tearing into a high speed turn-off and turn the nose wheel to get into that gentle curve it may be quite a shock to discover that the nose wheel turns, but the airplane does not! The nose wheel may just slide sideways. The airplane starts a little turn, but never completes it and one winds up somewhere between the runway and the turn-off in very unfriendly country!
Although we can’t take a high speed turn-off as fast as airport designers and ATC would like, we should try our best to get off the runway as soon as possible. If it’s a busy place there may be another airplane close behind and if we dawdle about the runway, go clear to the end before getting off, etc., the poor guy behind us may have to go around. And who knows, someday that guy might be you.
- From the archives: Bob Buck on William T. Piper - September 9, 2021
- From the archives: Bob Buck on low approaches - March 19, 2019
- From the archives: Bob Buck on radar - November 20, 2018


Omg I love bob buck
If you have never read his ‘North Star over my shoulder’ stop whatever you are doing and BUY IT RIGHT NOW!
This is classic bob!
Thanks john for running these incredible articles from a great pilot and writer.
Bob reminds us that the approach ought to be stabilized at the OM. I teach instrument students of the importance of that concept; that, if stabilized early on, descent on the glide slope will be far less “busy.”